


EnixLHQ
-
Posts
704 -
Joined
-
Last visited
-
Days Won
1
Content Type
Profiles
Forums
Gallery
Store
Downloads
Blogs
Events
Everything posted by EnixLHQ
-
Ah, I concede the point. Interesting, though, that this is being abused at higher levels. It could be a rule I don't know about specific to those armies, though. Unfortunately, not a lot of Nighthaunt-specific tournament data to compare against. I'll revise if I do add this to the guide.
-
Nah, it's legal. The rule states "If a friendly unit is not coherent at the end of a turn or after you set it up..." A turn doesn't end until after the battleshock phase. This is used all the time in tournaments. Orcs (forget which ones) use their 6" pile-in feature to abuse this rule to great effect.
-
Let me temper that excitement a little; we have got a lot of problems that I hope a new battletome will address. We're probably one of the best armies for the "rule of cool," but we have some mechanical issues that really pinned us down in 2.0. In 3.0 those issues are less, but still present. We went from "trash tier" (though I never believed that) to "mid tier" with the new edition, and hopefully soon we'll have a book that puts us fully into the competitive space. I definitely would start with the Chainrasps and Spirit Hosts. A max unit of either is really nice to have as options. You can fix your odd numbers by going to your local GW and asking if they have any models on sprues you can have or buy. The missing Reaper should be pretty easy to find like that. I wouldn't worry about the Glaivewraiths (you can actually use those as conversion materials. The new battletome may change them completely, but for now you can't take more than 8 in a game.) Between the Processions the tournament community believes Reikenor's Condemned to be the more competitive option. It brings tools to a game that fit the current meta well and the only cost for those tools is a Corpse Candle, which is pretty good. Emerald Host, it's amazingly cool theming aside, is considered casual for a couple mechanical reasons; the Emerald Curse's permanent -1 to an enemy hero Save is worded in such a way that it's easily undone. The rule in 3.0 is that you can have a max of +1 to save over your warscroll value, so the curse is effectively removed by just stacking +Save sources up to +2, which is legal. The other is the FAQs on "bodyguard" mechanics. The rule currently is that if any ability would prevent a model from taking a wound by transferring it to another model, that transfer prevents any additional ward saves. So, if you had Olynder and Hexwaiths, and she gets targeted, if she fails her save and has to take a wound but passes it to the Hexwaith, the Hexwaith has to take the wound. No Deathless. New FAQ undid this change.
-
Kurdoss is a beat stick with a hero tag. A Spirit Host and two Bladegheists in a compact package with their own ward save. Okay, so mechanically he has two uses. First, his ability to steal CP was patched in the FAQ to operate with the new 3.0 rules. If your opponent has a general on the field and receives a command point at the start of their hero phase for them being there, you can roll a dice and on a 5+ take it from them and add it to your pool. Yeah, not likely but also not so unlikely that it's impossible. This just has that "oh ******" value that tends to pop up at the wrong time for your opponent. Aside from that, he's a close-range bruiser. Super short. Everything is at 1", but it's 11 attacks across two profiles. Like any of our best abilities, his damage really relies on 6s. 6s to wound on his staff is D6 wounds at -2 rend. 6s to hit with the Heralds is a mortal wound. On his own it's not a lot, but with the other buffs in the death star his attacks are sure to hit. +1 to hit from the KoS, reroll 1s to hit from the ST, +1 to wound from the GoS, 5+ shrug from KC. It can easily make him deal a ton of damage with 2/2/-2/D3 and 3/3/-/1. If the target is a general then that RR1 becomes RRAll hits. In terms of usefulness, it depends on the buffs, luck, and the fact he can fill a hero spot. He's also not necessary, and can fill a much needed "pin cushion" spot. If he does well and your opponent yeets him, no big deal. If he does poorly he's still a mobile Deathless emitter. But, if you can buff him, he's a portable nuke. That sets him apart from other cheaper heroes.
-
I'd love to, but it's already so bloated and terrible! I'll see about making a second one and linking it, or something
-
Welcome to the faction. Hopefully we can get you the information you need to get you on your way. Feel free to ask about anything not covered. I have written a (very dense) guide for beginners that might help, too.
-
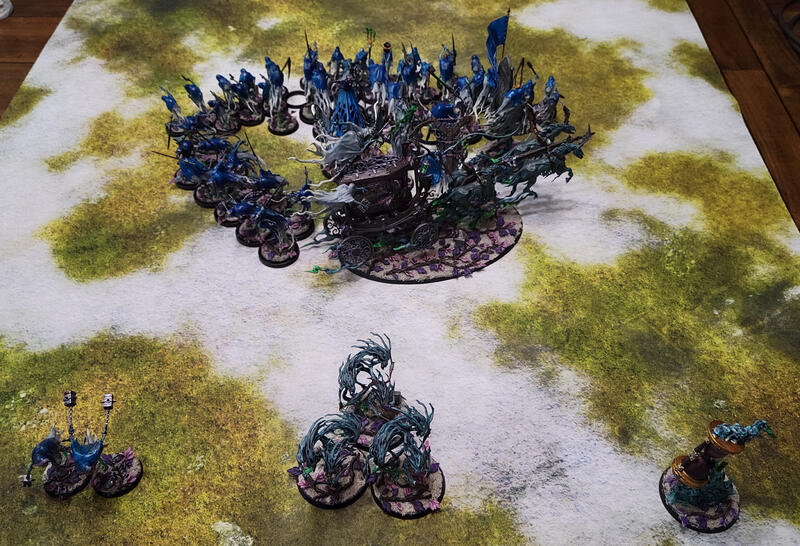
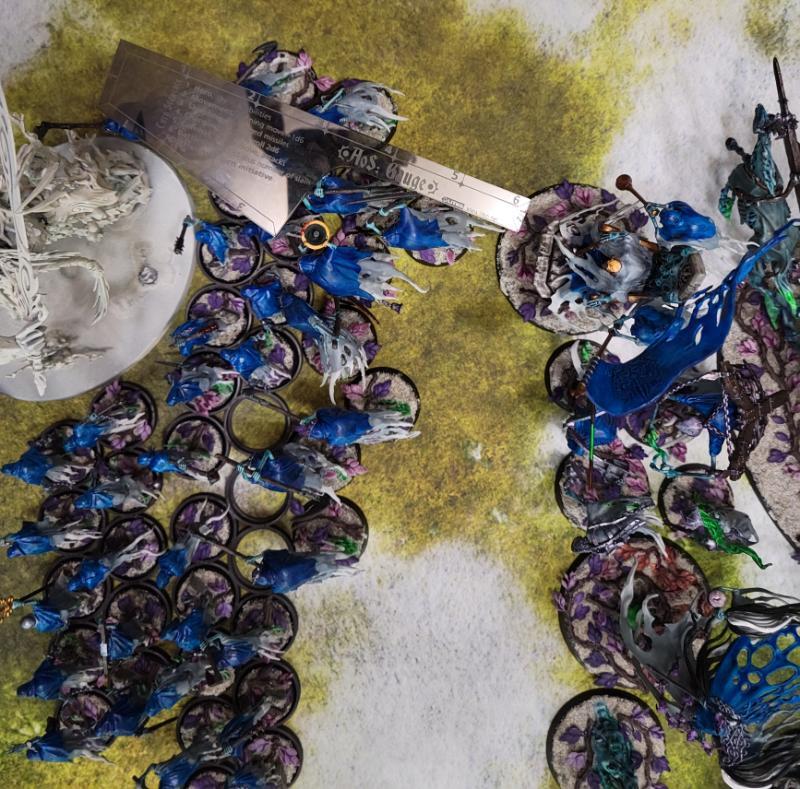
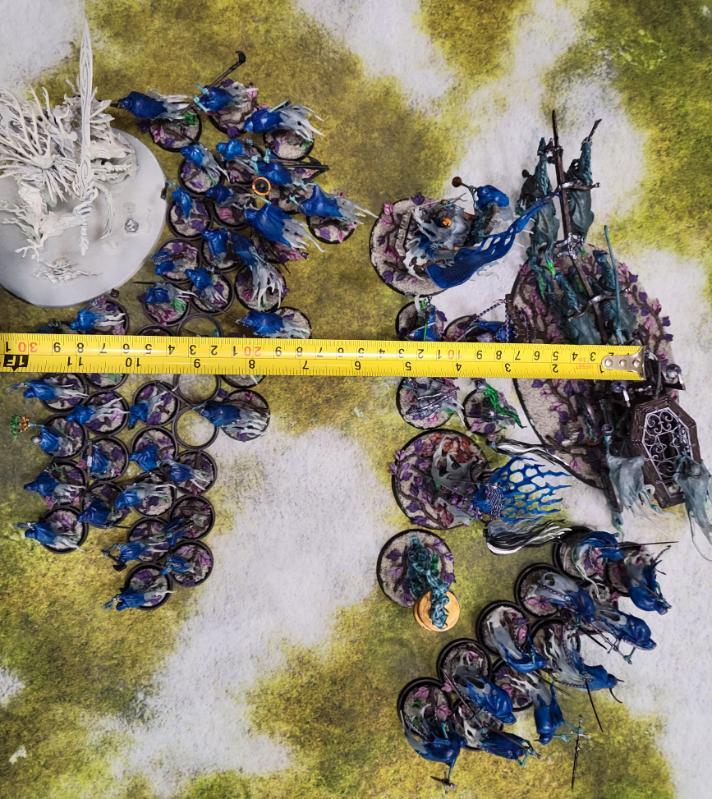
Figured I'd break out my models and try to illustrate in real space the concepts of both the Death Star charge and the Chainghast/Bladegheist interactions. So, first, the Death Star. Here's what 2000 points gets you in the Sotek build: The main body in the center is the Death Star. The Chainghasts, Spirit Hosts, and the Terminexus represent points, but should in the very least be what goes into the Underworlds and aren't on the field during deployment. (Ignore that I am missing some Chainrasps, they are currently being stretched on the rack [read: mended with drying superglue] for their misdeeds. Also ignore my movement trays, I'd have taken them out in a real game.) Here's a closer look at the formation itself: Each of these units and their position is pretty important. The Chainrasps perform two functions: The bulk of your damage output and the biggest buffer against incoming damage. The Reapers perform one function, essentially: Higher damage output against hordes, but otherwise extra damage that swings with Chainrasps. The Bladegheists and Black Coach have versatility: If your opponent can't put anything in reserves, isn't fast, can't teleport, or can otherwise exploit an exposed back end, they can roam and engage threats on the field. Otherwise, they provide flank support for your heroes and, in the case of the Black Coach, provide healing. Heroes The Spirit Torment needs to be as close to the center as possible, both to hide it as much as possible from enemy targeting (it is arguably the most important model in the setup), but also so that everything is within 6" for it's Captured Soul Energy. It is not the general for this exact reason. The Guardian of Souls has a similar need. Being the General in this build, staying central allows for Ruler of the Spirit Hosts to have maximum targets. The Krulghast Cruciator has a little play, both the Empowered Excruciation and Pendant of the Fell Wind that it carries having a wholly within 12" range. Shooting at 12" also means it can be back a bit. Knight of Shrouds also needs to be wholly within 12" for its ability to affect everyone, but can be offset just a bit for hopes of engaging in battle, if and only if, Soul Cage was successful. It's carrying the Mystic Tome in this build, and Soul Cage also has a range of 12". Kurdoss is there for violence. Just keep him protected until you can use him. He goes on the outside edge because he thirsts for a fight an can engage at your discretion. Lady Olynder does all her consistent damage 10" and needs to be within 6" to use her Grave-sands. So she gets a spot centralized with the group, but can edge up as needed. Though she has 2" on her staff, she should never be in combat unless your Chainrasps can prevent a 1" enemy weapon from hitting you, and never if they are carrying anything more than that. Functionally ignore her Handmaidens for this reason. You might notice there is a gap. That is because: You will want to cast the Terminexus as soon as possible. If there is any ranged, or damaging magic, or any chance that the enemy can engage you before you want to fight, you have this to keep your heroes alive. Your opponent is not only going to have to hard-target a hero to get enough wounds on it to kill it, it has to in a single round, otherwise you will have at least 1 hero phase to start healing. It goes here because it has a 6" range, but not wholly, in which to heal, and putting here makes it easy to hit all the heroes and the Coach (if the Coach is with this group). Okay, that's the basic formation out of the way. Keep in mind that during the course of a game, things can shift and jostle, and you may opt to detach units like the Bladegheists or Kurdoss at any time. As long as your heroes are protected and your buffs are overlapping and affecting everyone, that's the core takeaway of this formation. Now, what about getting into combat? Ideally, you want to dictate when that happens. With the Pendant of the Fell Wind, the entire group can move 9" without a run, accounting for the slowest of the group. Since you won't attack with most of the heroes, they can run bringing the movement of the entire group to 11" and still being able to charge, so long as Oly and other 6" movement heroes roll a 2 to run. If they lag a bit, that's okay if the buffs stay in range, but don't lag too much. You still have to consider ranges after charging. When engaging, try not to do this first setup: While the Chainrasps only need a 3 to successfully charge, coming in dead-on means you won't have a lot of room for the Reapers or Kurdoss to join the fight. If this is all you can manage, either because of terrain or other factors, then certainly go for it and maybe leave a gap in the middle for a Reaper to get within a 1/2". But this isn't ideal. Instead try to manage this: Coming in at an angle means you can leverage the charge roll to position as many ghosts swinging for blood as possible. (Ignore my bad positioning of that Chainrasp that violates the 3" rule. This was hard to photograph and keep everything in check...) Considering roll averages, a charge roll should land around 6. This setup allows for even worse rolls to still be advantageous to you. The Chainrasps need only a 3 to engage. Let's assume you roll a 4. A roll of a 4 will place you somewhere like this. Obviously, if you roll higher or manage to net that all-powerful Wave of Terror, this will look completely different. Use the distance you can move to get into position, remember you have 3" of pile in available on activation, but also remember you need your buff auras. So, now the Reapers: The Reapers only need a 4 for one of them to make contact. You only need one to do so. Since the average charge roll is 6, you are still better than average if you can get a 4-5 for comfortable movement. No matter what the charge roll is, just make contact with one reaper and then flow the rest behind. So let's assume they make the charge. Reapers, with their 2" of range, should fall in behind the Chainrasps. Kurdoss. Oh Kurdoss. He's itching for a fight, and if you played your movement and charges right, he only needs a 6 to get it. A perfectly average roll percentage. Okay, so my ability to take pictures and also use rulers kind of stops around this point, if it hadn't already. Try to take the angle of the picture, the balanced ruler, and everything else with a grain of salt. Just a grain, though, save the rest for Kurdoss. Keep in mind, we're doing something with all this movement very few other armies can do. We fly, so we can ignore our own models when measuring movement. Our only bit of concern is making sure the model's bases can go where you want them to after the move. No curve rulering necessary, and Kurdoss can take great advantage of that right here. Anyway, why was all this necessary? The buffs! And here is my absolutely poor attempt at showing you what I mean. After all of this your wholly within 12" buffs should still be in range. Fire off that CP on the KoS, revel in the free RR-misses/1s, soak up that +1 to wound! But, be careful. Your front is now exposed should something slip in for your heroes. If you engage like this and cannot quickly kill what's in front of you, consider the next phase carefully. If you win the priority, great, you can shuffle your heroes somewhere. If not, hopefully this big mess means that your opponent focuses on what can certainly kill them in the second round of combat and not the heroes, or are too far away with reinforcements. Lastly, remember your Terminexus; it's there to keep your heroes up, but if you don't need it have it fly out and turn on damage mode to assist with some mortal wounds. Oh, and the Black Coach and Bladegheists can also join in if they are a part of the Star and not needed for rear protection. Okay. Chainghasts. Why Chainghasts? This is why. You can zone in a unit of these at minimum range, 9" out, at the end of the movement phase. Not pictured: The Bladegheists who are, of course, in the perfect position to charge. And here are the Bladegheists. No, they don't bunch up like this and fight in two ranks, I just wanted to grab a quick picture. The important part here is that there is more than enough room, even if wrapping around an enemy, to stay wholly within 12" for the buff. It's generally better to use the Chainghasts for this partially because they are cheap, partially because they are not benefitting anyone other than the Bladeghests and so you are not losing out on anything when they are in the Underworlds, and partially because if you fail the charge with the Bladegheists you don't have a Spirit Torment hanging out by itself ready to be picked off. That being said, if you do opt to use a Sprit Torment like this, there's nothing wrong with that. For sure Captured Soul Energy and Deathless Sprits are worthy reasons to park a ST in reserve for a moment like this, or accompanying them around the board. Just mind movement distances all involved units are capable of, including running. Not sure why this Kurdoss pic is here again. I can't get rid of it. I guess Kurdoss is just that angry...


-
Limited hero spots, their costs, their board time, and them almost always being targets when on the field are the main reasons. A ST is always going to outperform Chainghasts, no question, but you also have to weigh the cost of potentially losing that ST vs losing Chainghasts when accompanying the Bladegheists. -1 to hit from Look Out, Sir helps, but not as much as not even being on the board. A ST you will very much want out on turn 1, or at least once fighting starts, otherwise you're losing out on the free healing, model returning, and rerolls, and all of the points the model is worth. But Chainghasts? Who cares if you have them in reserves for a couple of turns? The other thing to consider is how you're using your troops. We're not a "stand and fight" army. Hammer and Anvil rarely works out for us. We want to be the ones charging into battle, but we also need that battle to end very fast, unless you're trying tar pit with Spirit Hosts or Chainrasps. That often means hero support is required for that damage, but also means having the bodies that actually do the swinging and doing damage. Aside Olynder, Kudoss, and either Knight of Shrouds you're not going to be getting a ton of damage from the hero itself, but rather the unit you can bring with them. The difference of 40 points might mean another unit of bodies somewhere. In the end, it'll always be your call. If ST was cheaper, I'd bring two every game. But my experience has been that it often means leaving out an endless spell or coming too far under points to be equal to my opponent.
-
Welcome to Nighthaunt! We've got the Halloween spirit around here all year long! So, yeah, Chainghasts come in units of 2 or 4. They do have to stay within 1" horizontally and 6" vertically of each other. And, to use that bubble of Spirit Torment goodness, you need them wholly within 12" of a Spirit Torment. This works out to be more like a Venn diagram than a whole other bubble of buffing on the table. This doesn't stop you from bringing multiple units of Chainghasts to do it again, though. BUT! That's not where their strength really lies. These guys are an easy choice to put in the Underworlds to sit for a while. Their ranged damage from their flails of therapy is, at best, 3 damage each so you don't really need them trying to shoot things. What they do best, though, is pal around with Bladegheist Revenants. The Bladegheists get the full buff of having a Spirit Torment near by if the Chainghasts are there, and there doesn't even need to be a Spirit Torment in the game for that to happen. Drop these emotional support professionals from the Underworlds as close you can to the enemy unit you intend to charge and then charge the Bladeghiests into them. 9" out is plenty of room for their 12" aura to affect the Bladegheists. Be careful, though. The melee flail attack is really, really tempting. 1 attack for every enemy model in 2"? Depending on what you charge, that could be up around 2 or 3 attacks on average and not a lot of damage. I'd only advise it if you see the very specific scenario of a hero next to a unit full of 25mm or 32mm models that your BGs charged. You could charge the Chainghasts into the hero and use the suped-up swings on it. But even then I probably wouldn't.
-
The filigree does seem Nighthaunt. It appears on some of our things, like Olynder's corset and Kurdoss' throne. It's also similar to Kurdoss' crest and the Black Coach's wheels. But I don't know if that's a NH brand vs GW's take on the detail. The bones are the first place where I'd think this is something not NH, though. Hexwaiths are the only place where bones are outright a part of the design, where in other models with bones there's also a fair amount of flesh, too. It may end up to be "ghostly" bones, though.
-
Simplest way would be to make sure he has a Krulghast Cruciator as one of his hero choices. That 5+ Deathless Spirits will help quite a bit. Otherwise, NH is about the right hero choices that cover the right troops. Chainrasps are the cheapest way to get a ton of models on the table, and Spirit Torments are probably the best heroes you can take for their buffs and ability to heal and bring back models. Start there and build around it. Emerald Host is great, but don't rely on the bodyguard mechanic for longevity. Instead, capitalize on the extra damage it offers and the curse it brings. I love, love me some Harridans after their warscroll update. But, in terms of raw damage output they still can't compete with Bladegheists on a charge with a Spirit Torment or Chainghasts near by. In fact, that's the rub of it. If you can bundle the Bladegheists and Chainghasts together in some way, that will make the point investment with them over perform their value. If you can't, then the Harridans will do better. And the way the Death Star build above works, the Bladegheists make up the rear of the Star while the Chainghasts go into reserve. When I'm ready to charge with the bladey-bois I drop the Chainghasts at 9" from the unit I'm going to charge and then charge with the Blades. They'll blender any equal-sized group. And, chances are high that the Bladegheists can retreat over that enemy into another squishier unit in the back line, like a bunch of ranged.
-
Played my 1750 game today. I lost... I was at the top of the order, so if I had won I'd have had two games today. The battleplan was Savage Gains. My opponent was Cities that was pretty much a maxed-out Sylvaneth variant. I was able to use my reserves again, so I started in a very strong position. I even had the first turn priority, but opted to give it away thanks to my positioning. I won't lie, I lost because I made some critical mistakes. Blunders, even. I can count 3; the first being that I misunderstood the battleplan and fought hard to take both middle objectives for no extra points and a spread-out army, second that I left my own home objective forgetting that he had reserves to zone in and take it for a whopping 4 points, and the third to FORGET TO CHARGE WITH MY REAPERS ALL GAME! Sigh... I suppose I was too excited and made some really rookie mistakes and no one to blame but myself. Still, despite those mistakes, I managed 3 Wave of Terrors, killed Durthu by turn 3, and stalemate his advances on all other fronts. But, my opponent knew the power of keeping his own objective safe to deny me the same bonus he got from taking mine, so...in the end he took the game. But, every loss is a win if you learn something new, and this time I learned (in addition to the above), that I need to slow down. This is why I'm still a novice at the game. Moving on, though, is the 2K game. I'll be using Sotek's Death Star build below. The speed I gained in the last points upgrade did amazingly well (despite the loss) and now the firepower should bring it all together. Hopefully.
-
Why would you play with a -1 save? Ethereal means nothing can modify your save, + or -. Did you also play that you could use Mystic Shield, All-out Defense, Their Finest Hour, Garrison, or Cover to make up for it? Because we don't get those, either. Then again, I've been up against Beasts of Chaos many many times and I think I lost less of 5% of my games against them, so I can certainly see why you'd give them a buff. Though, if I would do anything to even the playing field with us, I would grant that the Herdstone gives +1 to hit in that growing aura. Same net benefit, less onus on you to waste CP on something you wouldn't spend it on in a normal game (assuming you played that if your save can be lowered, it can be raised, too). If you don't want them to lose out on All-out Attack or other +1 to hit abilities, you can make it +1 to wound instead, which only has Shademist as a counter. Your games, your rules, obviously, I would just caution to not play games where you have to pretend a rule in your favor or detriment exists. You might find yourself unintentionally cheating with other opponents who don't know better.
-
I'd say there is an argument to be made for an additional spell, but I don't have any data from tournaments or originations that are allowing this for Nighthaunt. Sounds like a FAQ is needed, or a new battletome. The key takeaway is that, RAW, Midnight Tome grants the Wizard keyword, Arcane Bolt, Mystic Shield, and one spell from Lore of the Underworlds. In addition, it grants one spell cast in your hero phase and one unbind attempt in your opponent hero phase. If they were already a wizard, this grants one additional spell cast in your hero phase. This was needed in 2.0 to get the one Spell Lore, but in 3.0 Spell Lores are granted in the 27.3 Enhancement section. Spell lores are a part of the set of 1-each universal enhancements every allegiance gets and that includes artifacts. It applies at the same time as the artefact being allocated does? Shrug? If so, then whomever gets the Midnight Tome gets a Lore for the artefact and then another for the Enhancement - Spell Lore that's granted. The only way this isn't true is if order of the subsections matter and are also restrictive. Meaning that in step 27.3.3 the artifact is allocated, but not any spell lores even if the artefact granted any, because in 27.3.4 the Spell Lores are granted. I don't think this is the case. Also tools like Warscroll Builder and the new AoS 3 app (yes, beta, I know), don't allow a second spell for taking a Midnight Tome. Your call at your tables, or the call of the TO at any event. Love the diagram. I really wish TGA's blog section allowed for more rich editing options. Pages, keyword links, images that weren't just big blocks breaking up the text... Anyway, Sotek's (and therefor my retelling/reinterpretation) use of the above goes more like this: You charge with the Chainrasps and they start to wrap around the enemy. Since part of the strategy is not to charge from too far away, your average roll is going to give you enough room to pack them in like in your diagram, but shifted more to the left or right slightly. Then, when you charge with your Reapers they should only need 1" more than the Chainrasps, and instead of piercing the middle of the 'rasps a single Reaper tags the enemy to one side of the 'raps. The rest of the Reapers can just pile in behind the 'rasps. Finally, Kurdoss and whomever else slips in to the sides. Then, when combat starts, you use pilein to adjust. More like this: Assuming that target is a unit and not a single model, this encourages your opponent to take models away from their front, reducing their combat potential. If they remove from Kurdoss' side, he can still attack with no counter. Same for the Reapers. Your opponent will have to make hard choices. You can also use your pile in to shuffle your models around to provide some cover. Can't move further away, of course, but as models lessen you can fill gaps.

-
Looks Ossiarch to me, at first glance. That symbol, is that a Chaos faction? Could be Chamon's symbol if it wasn't scribed normally.
-
Emerald Host working out for you better than Reik's Condemned? I didn't have much success with it once they forced the command trait on us. But I'm interested in hearing how you work with it. How many games can you get in a month? I figure you'd do better sticking to your list doing minor tweaks if you can only get a few games in, but if you can get in a bunch then throw everything at the wall and see what sticks. Here's hoping for a good event!
-
I'll be having a strictly "for fun" game in the near future. I'll put Big Drogg in it and see how it goes. I don't have the model, but my opponent won't care if I can match the base size and generally indicate the height. No idea how I'd build around him, though. That's going to need some thought.
-
Ah, my winning streak finally broke! 5-1! In my escalation league, we finally played 1.5K points. My list was as follows: One of the first things you might notice is that my list is 5 points over the limit. That was because both my opponents fell exactly 5 points over as well, and since it allowed me to slot in the Terminexus instead of the Reaper Scythe, I had no issue with it. I won't get into a ton of details, as I have done so with every game so far and it's the same two armies each time so I'd bet it's getting pretty boring until 2K. This was a one-game day (to remind; we dice off and the top two go first, and then the winner takes on the third. I rolled lowest this day). The battleplan was Tooth and Nail, and I will state plainly that I think that is the main reason I lost. No reserves? Against an army that doesn't put anything into reserve? It's a tall order to get around. The second reason I think I lost was I had too many points tied into hero support at this level and not enough units with which to do trickery with. I rushed Olynder instead of maybe going for the Black Coach or swapping some units around. Since I am ultimately building toward Sotek's Death Star build and using these games as practice, I didn't have enough to break off and hold multiple locations without troop support. I lost, but by a thin margin. I killed whatever I came into contact with, the Terminexus kept my heroes all alive despite being targeted, and rolled across the board like a tidal wave. But, I couldn't detach the Harridans against behemoths and have them hold their own, Olynder was too slow to support with mortal output, and consistently losing the die roll for priority and getting one of my objectives destroyed from under me all combined into a losing strategy. With the next 250 points I have decided to drop both Dreadscythe Harridan units, add some Bladegheist Revenants and Spirit Hosts, and the Black Coach. The KC will swap the Midnight Tome for a Pendant of the Fell Winds for some speed I don't think my opponent will be expecting. The Spirit Drain--which has been extremely useful against behemoths and monsters--will go to the GoS since he doesn't always have to cast Spectral Lure. And, being 30 points under, I'll probably have a Triumph. Let's see how it goes!
-
Had a chance to listen to the podcast. They don't get a ton into the circumstances that Nighthaunt are facing in 3.0 that are unique to us other than the often need to kill something big fast if and when that thing shows up. For some background, the ally used was Big Drogg Fort-Kicka - Gatebreaker Mercenary. The data below is from Battlescribe, so if any of it is wrong, blame that. Points: 525pts, 35 wounds, 7 Bravery, 4+ Save, Move 12" at the start. It basically has all the tools that are useful in 3.0 rules that we lack, including being a monster, basically flying, does extra damage against garrisons, extra damage against monsters, breaks terrain in addition to standard monster terrain breaking, stacks another -1 to Bravery with our own, and just a ton of damage output with a lot of it at -3 rend. As an ally, this seems like a great pick, but as the Nighthaunt player says in the podcast it didn't necessarily win him his games. It answered otherwise unanswerable challenges we can't beat, like taking less than 2 turns to kill a big big thing, but suffers from being the big-thing-on-the-table syndrome itself and can get caught up. You still need to play to the strengths of the army, and your opponent and the battleplan will be heavy variables still needing planned around. He didn't contrast and compare his list with a gargant with ones without. And, did I catch that right, he had two Black Coaches? He also never really got into the meat about what he expected this list to do. Your interpretation of his outcomes will be your own. I think it's worth a shot to play with.
-
I assume this is it: https://cubicshenanigans.net/back-in-the-saddle-at-nashcon-2021-episode-80/ I'll be giving it a listen later.
-
I'm not sure if everyone really is all that fond of the Horrorghast, but if we are it's more because of +D3 models that run when the unit falls battleshock. That stacks with Lady Olynder if she's near by, resulting in 2-4 models running on top of what runs with the check with no hope of a command point to stop it. For Geminids to work the damage has to be allocated first, and there's a chance that won't happen. Between the die roll and possible ward save, it's likely it will work but there's a chance it won't. Nothing wrong with either choice. Choose the one that best fits your style and opponent.
-
Some more updates to my guide Added a Know your limits section to General Tactica (Underworlds/Spectral Summons into a charge isn't the best of ideas, guys) Added more information to Chainrasp Horde about their base size and what that means. Expanded Lady Olynder and Kurdoss Valentian into full-fledged write-ups thanks to their rebirthed usefulness in the new era. Added text to the end of Battery-Powered Curse Hearse to give more weight to the Reaper's Scythe option. Fixed the Shyish Reaper ability description. Does more damage than I had stated. A Thanks and Credit section at the very end Small edits in many other sections
-
Don't know what Nighthaunt units you have access to, but the list looks fun. Enough NH models to get a taste.
-
So long Amulet of Destiny, hardly knew ya.
-

nighthaunt As the Nighthaunt Taketh: A beginner's guide
EnixLHQ commented on EnixLHQ's blog entry in The Procession of the Enixian Duskhaunt
Just realized I've been neglecting this comment section. 😶 Guide has been updated to AoS 3.0, including all FAQs as of this post. As always, please comment any questions, corrections, or observations you like. Enjoy!


