


Nqshou
-
Posts
39 -
Joined
-
Last visited
Content Type
Profiles
Forums
Gallery
Store
Downloads
Blogs
Events
Posts posted by Nqshou
-
-
Not sure if I can link a picture of the new points for Sylvaneth?..
Treelord and KH battleline in the right sub-faction.
Edit : Already posted in the Rumor Thread by someone else:
Battleline:
Dryads 100
Tree revenants 110
Conditional battleline:
Treelord, oakenbrow army 260
Kurnoth hunters, heartwood army
Bows 230
Scythes 250
Swords 250
Spite revenants, dreadwood army 105
Revenant Seekers, Harvestboon army, 235
Spiterider Lancers, Harvestboon army, 210
Leaders:
Arch-Revenant 120
Branchwraith - Unlisted -
Branchwych 130
Drycha 335
Ylthari (and guardians) 180
Lady of Vines 325
Warsong Revenant 305
Alarielle 840
Treelord Ancient 360
Spirit of Durthu 370
Other:
Gossamid archers 220
Skaeth’s Wild Hunt 110
Endless spells:
Spiteswarm Hive 40
Gladewyrm 50
Vengeful skull root 60
Awakened Wyldwood 0 faction terrain
-
 1
1
-
 1
1
-
 1
1
-
-
So we've got many new rules with the WD update and the new GHB 2022-2023 Galletian Veteran keyword.
Have you already though about new list ideas?
Do you plan to include 6 pack Flayers as they can now fight on two rows? Do you plan to skip on the Vargulf as our GK/AA can now return model with that sweet new heroic action? What about an infernal courtier that can now return model two times in the hero phase?
I'm quite excited with all the changes, but I am still a novice player, so I'm keen to know what you guys have in mind.
Edit: Spelling mistakes.
-
1
-
-
Any hope that the new Nurgle battletome could make pestilien skaven army competitive?
-
8 minutes ago, Liquidsteel said:
Unfortunately both rules were played incorrectly, which in a weird way isn't so bad because now you have two bits of information to take you forward in your next games.
1) The triggers for being able to pile in and fight are that you are within 3" of enemy units OR that you made a charge move that turn. So because you made a Charge, you were indeed eligible to pile in and fight the hero. Effectively from where you finish your charge, providing you kill the screen in the first activation, you have a 6" threat range with the Fanged Maw for the second activation (another 3" pile and 3" maw). For what it's worth, the hero being 3.1" away mean you could still use your 1" reach attacks.
2) He was incorrect. Feeding Frenzy is not a separate activation as you are not picking a unit to fight, you are allowing a unit that just fought to immediately pile in and attack again. So thanks to Savage Strike and Feeding Frenzy you can fight 3 times before your opponent gets his turn to pick a unit.
Thank you very much.
")
-
Good evening,
I had a game today that went well, but we couldn't find the answers to two questions around Feeding Frenzy:
1. I charged my Abhorrant Ghoul King on Royal Terrorgheist on a screen, that I killed, then I wanted to reactivate this model though Feeding Frenzy to pile-in into a hero that was 3,1" away from my AGKoRT, and use my attack that are 2" and 3". Could I? My understanding was no, I couldn't pile-in as my AGKoRT was not considered in combat with the hero as he was more than 3" away from him.
2. I charged my AGKoRT, and thanks to Gristlegore trait Savage Strike, I could attack with the strike-first effect. I then used feeding Frenzy on the same AGKoRT. Next I wanted to activate a second unit as I fought with strike-first effect with my AGKoRT, but my opponent though that as I used feeding frenzy, it used a "second" activation, which meant he could attack next with his unit. Was he right?
Thank you.
-
What's your two cents on Varghul vs Crypt Infernal/Haunter Courtier as a support unit for a blob of 6 Horrors/Flayers?
-
On 10/1/2021 at 1:05 AM, EnixLHQ said:
Figured I'd break out my models and try to illustrate in real space the concepts of both the Death Star charge and the Chainghast/Bladegheist interactions.
So, first, the Death Star.
Here's what 2000 points gets you in the Sotek build:
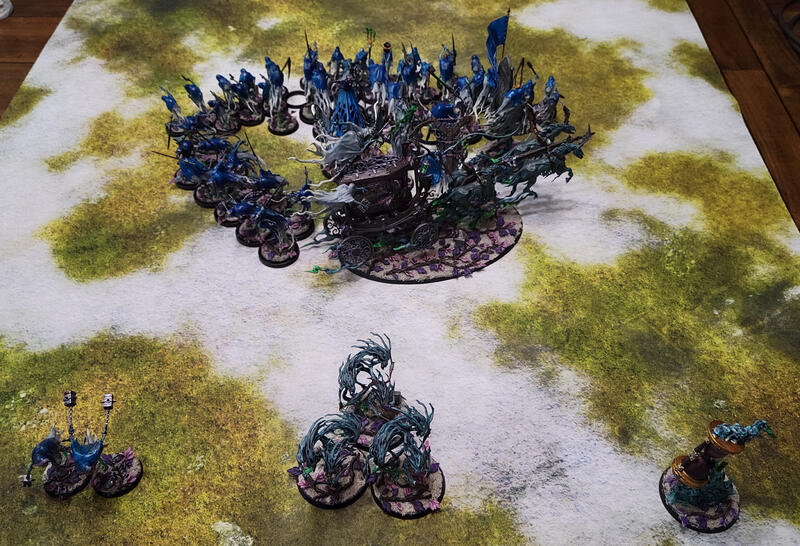
The main body in the center is the Death Star. The Chainghasts, Spirit Hosts, and the Terminexus represent points, but should in the very least be what goes into the Underworlds and aren't on the field during deployment. (Ignore that I am missing some Chainrasps, they are currently being stretched on the rack [read: mended with drying superglue] for their misdeeds. Also ignore my movement trays, I'd have taken them out in a real game.)
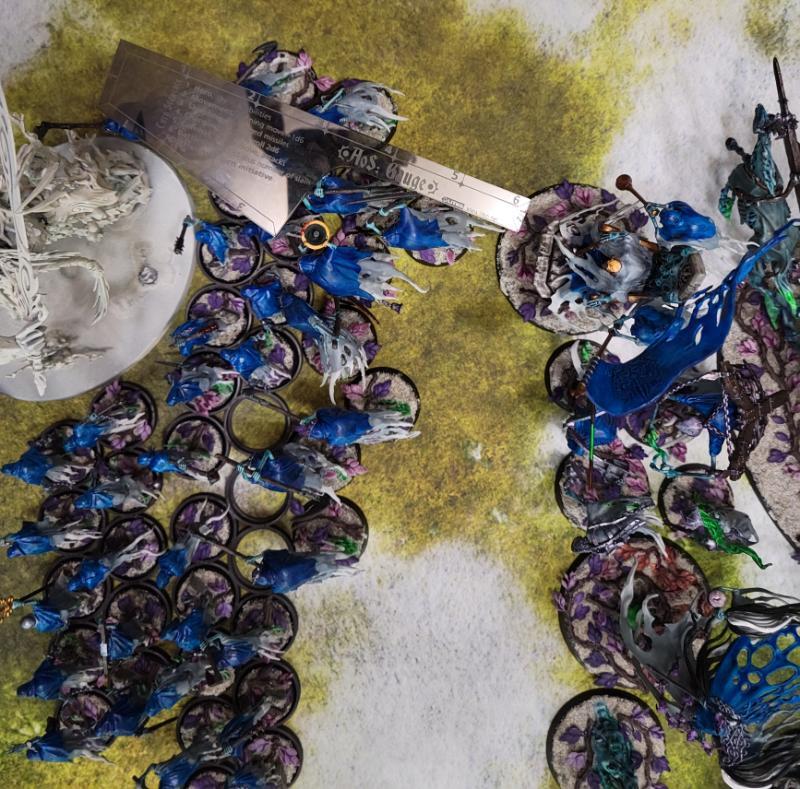
Here's a closer look at the formation itself:

Each of these units and their position is pretty important.
- The Chainrasps perform two functions: The bulk of your damage output and the biggest buffer against incoming damage.
- The Reapers perform one function, essentially: Higher damage output against hordes, but otherwise extra damage that swings with Chainrasps.
- The Bladegheists and Black Coach have versatility: If your opponent can't put anything in reserves, isn't fast, can't teleport, or can otherwise exploit an exposed back end, they can roam and engage threats on the field. Otherwise, they provide flank support for your heroes and, in the case of the Black Coach, provide healing.
-
Heroes
- The Spirit Torment needs to be as close to the center as possible, both to hide it as much as possible from enemy targeting (it is arguably the most important model in the setup), but also so that everything is within 6" for it's Captured Soul Energy. It is not the general for this exact reason.
- The Guardian of Souls has a similar need. Being the General in this build, staying central allows for Ruler of the Spirit Hosts to have maximum targets.
- The Krulghast Cruciator has a little play, both the Empowered Excruciation and Pendant of the Fell Wind that it carries having a wholly within 12" range. Shooting at 12" also means it can be back a bit.
- Knight of Shrouds also needs to be wholly within 12" for its ability to affect everyone, but can be offset just a bit for hopes of engaging in battle, if and only if, Soul Cage was successful. It's carrying the Mystic Tome in this build, and Soul Cage also has a range of 12".
- Kurdoss is there for violence. Just keep him protected until you can use him. He goes on the outside edge because he thirsts for a fight an can engage at your discretion.
- Lady Olynder does all her consistent damage 10" and needs to be within 6" to use her Grave-sands. So she gets a spot centralized with the group, but can edge up as needed. Though she has 2" on her staff, she should never be in combat unless your Chainrasps can prevent a 1" enemy weapon from hitting you, and never if they are carrying anything more than that. Functionally ignore her Handmaidens for this reason.
You might notice there is a gap. That is because:

You will want to cast the Terminexus as soon as possible. If there is any ranged, or damaging magic, or any chance that the enemy can engage you before you want to fight, you have this to keep your heroes alive. Your opponent is not only going to have to hard-target a hero to get enough wounds on it to kill it, it has to in a single round, otherwise you will have at least 1 hero phase to start healing. It goes here because it has a 6" range, but not wholly, in which to heal, and putting here makes it easy to hit all the heroes and the Coach (if the Coach is with this group).
Okay, that's the basic formation out of the way. Keep in mind that during the course of a game, things can shift and jostle, and you may opt to detach units like the Bladegheists or Kurdoss at any time. As long as your heroes are protected and your buffs are overlapping and affecting everyone, that's the core takeaway of this formation.
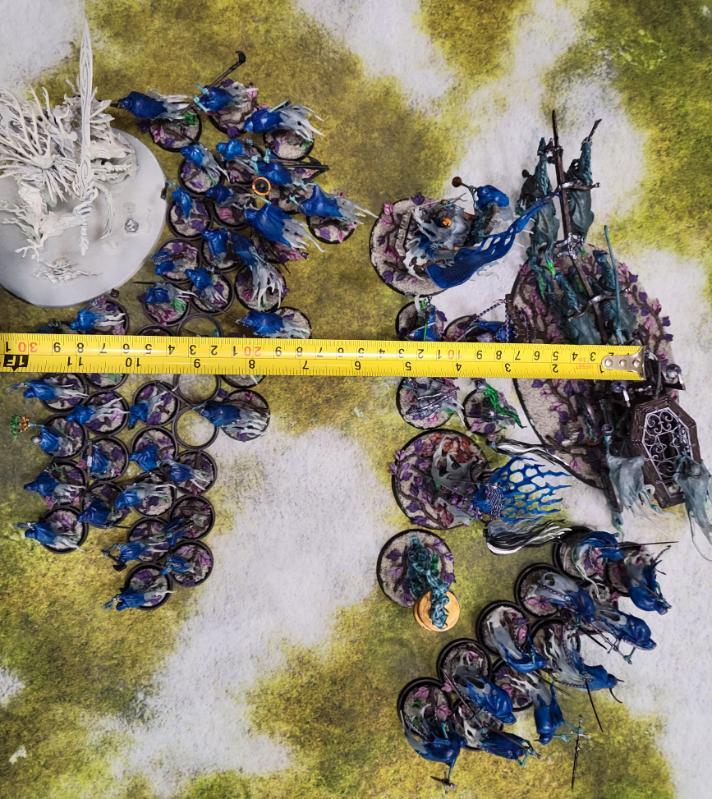
Now, what about getting into combat?
Ideally, you want to dictate when that happens. With the Pendant of the Fell Wind, the entire group can move 9" without a run, accounting for the slowest of the group. Since you won't attack with most of the heroes, they can run bringing the movement of the entire group to 11" and still being able to charge, so long as Oly and other 6" movement heroes roll a 2 to run. If they lag a bit, that's okay if the buffs stay in range, but don't lag too much. You still have to consider ranges after charging.
When engaging, try not to do this first setup:

While the Chainrasps only need a 3 to successfully charge, coming in dead-on means you won't have a lot of room for the Reapers or Kurdoss to join the fight. If this is all you can manage, either because of terrain or other factors, then certainly go for it and maybe leave a gap in the middle for a Reaper to get within a 1/2". But this isn't ideal.
Instead try to manage this:

Coming in at an angle means you can leverage the charge roll to position as many ghosts swinging for blood as possible. (Ignore my bad positioning of that Chainrasp that violates the 3" rule. This was hard to photograph and keep everything in check...)
Considering roll averages, a charge roll should land around 6. This setup allows for even worse rolls to still be advantageous to you. The Chainrasps need only a 3 to engage. Let's assume you roll a 4.

A roll of a 4 will place you somewhere like this. Obviously, if you roll higher or manage to net that all-powerful Wave of Terror, this will look completely different. Use the distance you can move to get into position, remember you have 3" of pile in available on activation, but also remember you need your buff auras.
So, now the Reapers:

The Reapers only need a 4 for one of them to make contact. You only need one to do so. Since the average charge roll is 6, you are still better than average if you can get a 4-5 for comfortable movement. No matter what the charge roll is, just make contact with one reaper and then flow the rest behind. Don't worry about cohesion at this step.
So let's assume they make the charge.

Reapers, with their 2" of range, should fall in behind the Chainrasps. Cohesion only matters at the end of the turn, so you can safely ignore it now an use their combat phase to consolidate.
Kurdoss. Oh Kurdoss. He's itching for a fight, and if you played your movement and charges right, he only needs a 6 to get it. A perfectly average roll percentage.
Okay, so my ability to take pictures and also use rulers kind of stops around this point, if it hadn't already. Try to take the angle of the picture, the balanced ruler, and everything else with a grain of salt. Just a grain, though, save the rest for Kurdoss.
Keep in mind, we're doing something with all this movement very few other armies can do. We fly, so we can ignore our own models when measuring movement. Our only bit of concern is making sure the model's bases can go where you want them to after the move. No curve rulering necessary, and Kurdoss can take great advantage of that right here.
Anyway, why was all this necessary? The buffs!
And here is my absolutely poor attempt at showing you what I mean. After all of this your wholly within 12" buffs should still be in range. Fire off that CP on the KoS, revel in the free RR-misses/1s, soak up that +1 to wound!
But, be careful. Your front is now exposed should something slip in for your heroes. If you engage like this and cannot quickly kill what's in front of you, consider the next phase carefully. If you win the priority, great, you can shuffle your heroes somewhere. If not, hopefully this big mess means that your opponent focuses on what can certainly kill them in the second round of combat and not the heroes, or are too far away with reinforcements. Lastly, remember your Terminexus; it's there to keep your heroes up, but if you don't need it have it fly out and turn on damage mode to assist with some mortal wounds. Oh, and the Black Coach and Bladegheists can also join in if they are a part of the Star and not needed for rear protection.
Okay. Chainghasts. Why Chainghasts? This is why.

You can zone in a unit of these at minimum range, 9" out, at the end of the movement phase. Not pictured: The Bladegheists who are, of course, in the perfect position to charge.

And here are the Bladegheists. No, they don't bunch up like this and fight in two ranks, I just wanted to grab a quick picture. The important part here is that there is more than enough room, even if wrapping around an enemy, to stay wholly within 12" for the buff.
It's generally better to use the Chainghasts for this partially because they are cheap, partially because they are not benefitting anyone other than the Bladeghests and so you are not losing out on anything when they are in the Underworlds, and partially because if you fail the charge with the Bladegheists you don't have a Spirit Torment hanging out by itself ready to be picked off. That being said, if you do opt to use a Sprit Torment like this, there's nothing wrong with that. For sure Captured Soul Energy and Deathless Sprits are worthy reasons to park a ST in reserve for a moment like this, or accompanying them around the board. Just mind movement distances all involved units are capable of, including running.

Not sure why this Kurdoss pic is here again. I can't get rid of it. I guess Kurdoss is just that angry...
Thank you so much for doing stuff like that!
-
1
-
Quick question : Gristlegore Terrorgheists are 300points on the warscroll builder but 305points on the new AOS app.
Do you know which tool is right?
Thanks!
-
5 minutes ago, GrimDork said:
Think that's because their save worsens as the suffer damage, scroll down and look at the damage table.
And you are right!
-
Leviadon have currently no save on the app warscroll.
-
@EnixLHQ Thank you very much for your answer!
-
1
-
-
@EnixLHQ Hello, your guide is well detailed and very usefull to a novice like me, thank you.
I have a question regarding this statement "Start with the Chainrasps leaving room for a Reaper to get within a half-inch, then Reapers doing the same for Kurdoss for his half-inch, then Kurdoss, then Knight of Shrouds (if Soul Cage landed)."
I don't understand how you can make an attack with Chainrasps then Repears then Kurdoss then KoS on the same target.
From my understanding you can do the setup below with one unit of Chainrasps, one unit of Reapers, but Kurdoss would be out of 1". So I am definitly missing something on the positionning of the models. Would you care to explain that to me? Thank you.

-
Thank you Honk, it's crystal clear now.
-
1
-
-
Thanks to both of you, I'm totally a novice!
I don't see any grand court choice in your list though @Dejnar, is that normal?
Edit: Ok I found the reason why. If you pick a Delusion (in your case "The feast day"), you cannot pick a Grand Court.
-
On 9/7/2021 at 1:10 PM, Dejnar said:
Tournament is over now and boy did it go well.
I managed to get most of my spells through every hero phase thanks to the +2.
Spectral Host + 4 extra attacks + rerolling hits for maw + feeding frenzy sent in turn 1 won me all games basically.
And even if they managed to kill the first Gheist another took it's place.
The other units basically never saw combat.
Went 3-0.
Well done for the wins! Could you please give us some intels on how you played this list?
-
iirc Flaming weapon cannot be given to a named character.
-
1
-
-
Good morning,
Novice here. I'm looking at this list and I'm wondering how can everything in this list be included within a single Battle regiment (one drop).
https://tabletop.to/justice-series-gt-august-20212/list/400-club
As far as I understand, a battle regiment is : 1 general, 2 leaders (10 wounds or less), 3 battlelines and a behemot or artillery
I see the general (Slann), and a priest and Eotg. The Eotg is above 10 wounds so he cannot be included as a leader, right?
Then the 3 steg as battleline, that's good.
Then I see salamanders and Bastilladon. That's 2 units for a single behemot/artillery slot.
I'm a bit lost, I feel I'm missing something. 😅
I would be grateful if someone could explain the above to me.
Thanks.
Edit: I figured it out.
Leader = Eotg eventhough he is not the general
5 units : 3 steg + 2 Salamanders
Behemot : Basti -
Sorry - To be deleted.
-
42 minutes ago, cadmachine said:
If you aren't thinking at a competitive level, then yes, this is gonna be a lot of fun but for anyone who were hoping their thousands of dollars and points were going to be competitive again its a bit of a let down.
Well, we all knew it was going to be like that once again. What the point to sell new models if people are going to stick to their old ones.
-
1
-
-
What do you guys think about Blood knight spam? Their warscroll seems so juicy.
-
51 minutes ago, AaronWilson said:
https://www.warhammer-community.com/faqs/
Another update today and a really good one, Wyldwoods fixed, multiple ward saved fixed, pinning a model with 2 models B2B fixed, cogs changed to 1 wizard and clarification on spell portal.I don't see the change to Wyldwood, am I blind?
Edit: I am. They removed "remove Navigate Realmroots allegiance ability and replace with the one in the woods warscroll".
-
50 minutes ago, Vik Vijay said:
Went to my first AoS tournament today! Managed to get 3-0 and come in 1st place at a 32 person event with my Legion of Night list I posted a few pages earlier.
Super happy with how the army played and can't wait to get some more competitive AoS games in!
Well done! Could you please give us a quick summary on how you play your list? What role do you give to each of your units?
-
It seems that Tomáš Panvesmíru Rut went 5-0 playing Sylvaneth in a 25 players tournament in Czeck Republic this weekend : https://tabletop.to/kral-vysociny-2
-
Good morning fellow KOs,
I'm looking for a paint scheme for my KOs, simplestic yet stylish. I am really loving Stonecast Eternals, but I don't think Kharadron Stonelords could be a thing - I don't see how a ship made of stone could fly. So I was thinking about 2 schemes:
Corroded steel scheme or Swamp scheme (with moss)
What do you guys think about that? Have you already seen any pictures that could help me achieve those paint schemes?
Maybe the answer is both paint scheme at once, with a base a corroded steel + weathering effect with moss?


AoS 2 - Flesh-eater Courts Discussion
in Death
Posted
Balance update: https://www.warhammer-community.com/wp-content/uploads/2022/06/yviFjtzHMd1fG6iG.pdf
FLESH-EATER COURTS
Change the Deathless Courtiers battle trait to:
‘Friendly Flesh‑eater Courts units have a ward of 6+.’
Does that mean that all our units have a 6+ ward even outside 12" of a hero?